


Did you know that even the best-looking website can quietly struggle to show up in Google if it isn’t indexable? If you want search engines to actually rank your content, you first need to check website indexability — and fix any roadblocks standing in the way. Skipping this step could mean leaving your website invisible to both search engines and potential visitors.
In this guide, you’ll learn how to spot and solve indexability issues in five easy, practical steps — so you can protect your rankings and grow your traffic in 2025.
What Does “Indexability” Mean in SEO?
Before we jump into the action steps, let’s make sure we’re on the same page.
When we talk about “indexability,” we’re asking: Can search engines add your pages to their index so they can show up in search results?
Without website indexability, even the best content will be ignored by Google. If you want your website to rank and bring you traffic, fixing website indexability issues is non-negotiable.
Website Indexability vs Crawlability: What’s the Difference?
A lot of people mix these two up, so let’s clear the air:
- Website Crawlability means search engines can access and scan your website.
- Website Indexability means search engines can actually add your pages to their index.
Your site might be crawlable but still not indexable — especially if misconfigured directives or code are silently blocking your pages. Want to learn more about crawlability? Check out this detailed guide on Website Crawlability.
Why Website Indexability Directly Impacts Your Search Rankings
If your site isn’t indexable, it doesn’t matter how perfect your keywords, content, or backlinks are — you won’t rank. Period. Google can only rank pages it knows exist and has added to its index.
Common Indexing Problems You Might Be Ignoring
Here are a few sneaky issues that often block Website indexability:
- Misconfigured robots.txt files.
- Accidental noindex meta tags.
- Broken links, orphaned pages, or server errors.
- Mismatched or missing canonical tags.
Now let’s break down how to fix these — step by step.
Step 1: Use Google Search Console to Check Website Indexability
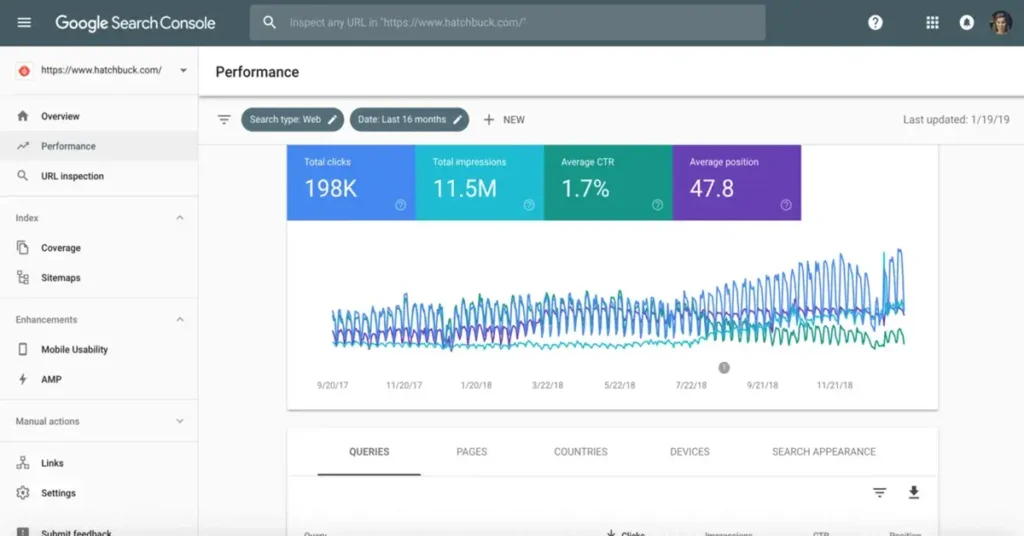
One of the quickest ways to check website indexability is through Google Search Console (GSC). It’s free, accurate, and provided directly by Google.
How to Find Indexed vs Non-Indexed Pages in GSC
In your GSC dashboard, head to Indexing > Pages. Here, you’ll see two main sections:
- Indexed — these pages are searchable.
- Not Indexed — these pages are invisible to users on Google.
This is the first clue whether Google can actually find and index your site.
Understanding Coverage Reports: Excluded, Valid, and Errors
Pay attention to these statuses:
- Valid: Indexed and healthy.
- Excluded: Blocked or ignored.
- Error: Needs urgent fixing.
Google offers helpful explanations for each, which you can read more about in their official documentation.
Action Steps if Pages Are Missing from Google Index
If your pages are stuck in the Excluded or Error category:
- Inspect individual URLs using URL Inspection Tool.
- Fix any crawl, redirect, or meta tag issues.
- Request Indexing manually once corrected.
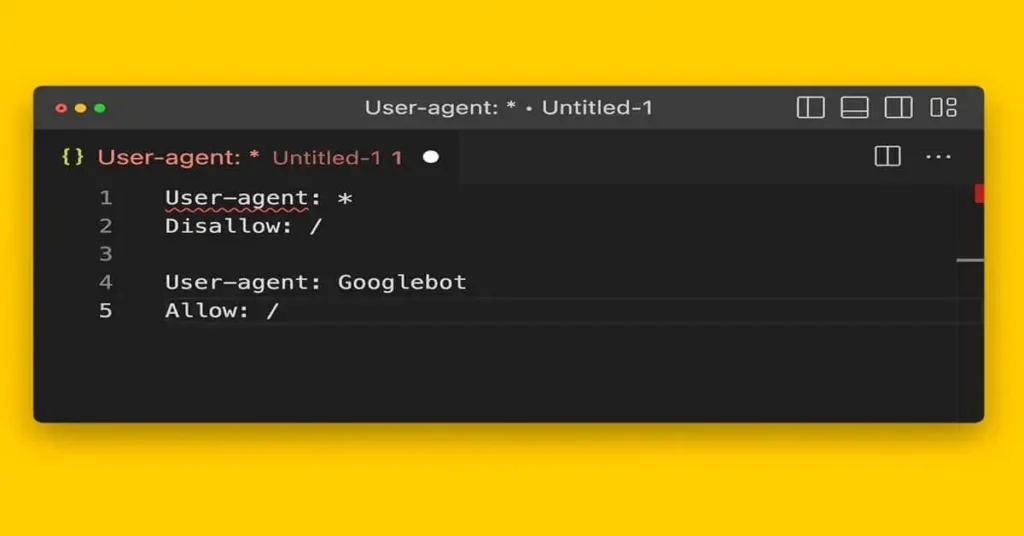
Step 2: Audit Robots.txt, Noindex Tags, and Meta Directives
If your site has invisible walls, search engines won’t index your content, no matter how great it is.
How Robots.txt Can Block Indexing
A wrongly configured robots.txt file can block entire folders or pages from being crawled or indexed. You can check your file at yourdomain.com/robots.txt and ensure no sensitive content is unintentionally blocked.
Spotting and Fixing Noindex Meta Tags
Noindex meta tags tell Google: “Don’t index this page.”
You might have added them for temporary reasons — but left them there by accident. Double-check your source code for:
<meta name="robots" content="noindex">If this appears on important pages, remove or update it immediately.
How Canonical Tags Can Override Your Website Indexability
Canonical tags are meant to avoid duplicate content, but if misused, they can stop a page from getting indexed. Make sure your canonical URLs point to the correct, intended version of the page.
Step 3: Use SEO Tools to Detect Hidden Indexing Issues

Sometimes Website indexability problems aren’t obvious — that’s where specialized SEO tools shine.
Screaming Frog or Sitebulb: Crawl Your Entire Website
Both tools mimic how search engines crawl your website. They can detect:
- Noindex tags.
- Broken internal links.
- Canonical mismatches.
- Blocked robots.txt paths.
Scanning your site monthly can catch these issues early.
Ahrefs & SEMrush: Checking Website Indexability at Scale
Ahrefs’ Site Audit and SEMrush’s Site Audit Tool can help you check website indexability for large websites and spot technical issues like:
- Orphaned pages.
- Meta tag misconfigurations.
- Server response errors.
Spotting Orphaned, Nofollowed, and Non-Canonical Pages
Pages with no internal links or nofollow attributes often stay unindexed. Make sure every page is accessible from at least one other indexed page and avoid unnecessary nofollow links to your own content.
For a quick online check, try the Seography Page Indexability Checker.
Step 4: Verify Server Response Codes and Redirect Chains
Google relies on server responses to decide if a page should be indexed.
Why 4xx and 5xx Errors Hurt Indexing
Errors like:
- 404 Not Found
- 410 Gone
- 500 Internal Server Error
Tell Google your page is broken or unavailable, which leads to deindexing.
Detecting Infinite Redirect Loops or Chains
If your page is stuck in a redirect loop, search engines will give up trying to index it. Tools like Screaming Frog highlight these problems so you can fix them before they hurt your visibility.
Using HTTP Status Code Checkers for Quick Fixes
Plenty of free online tools will let you check server responses instantly. Make sure all your important pages return a 200 OK status.
Step 5: Make Sure Your XML Sitemap Is Clean and Complete
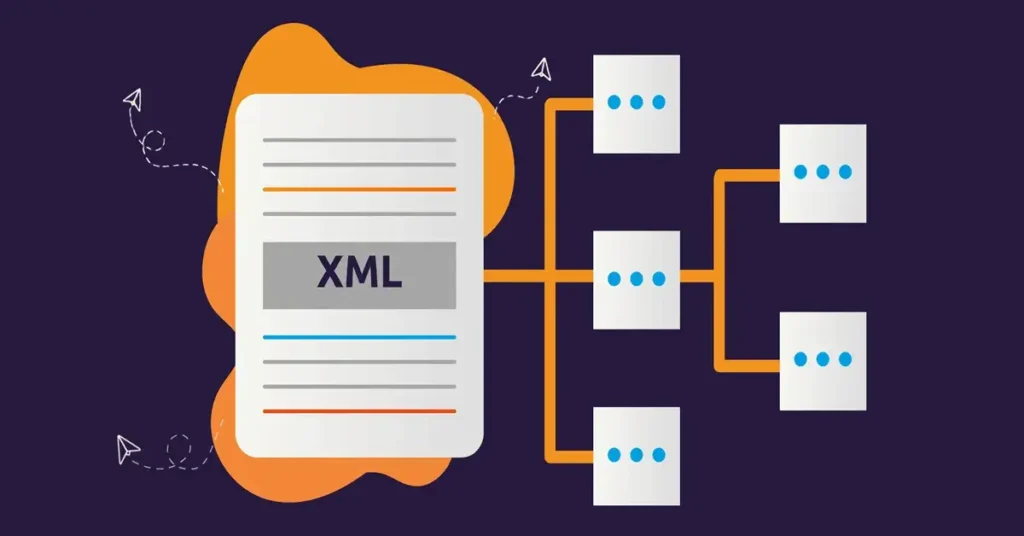
Your XML sitemap tells Google what to index. If it’s outdated or broken, your pages may never get indexed.
Why Your Sitemap Needs to Match Your Live Pages
Your sitemap should only include:
- Active, public-facing pages.
- Pages returning 200 OK status.
- URLs that aren’t blocked by robots.txt or noindex tags.
How to Submit or Update Your Sitemap in Search Console
You can submit your sitemap by heading to Indexing > Sitemaps in Google Search Console. After submission, monitor the status for any errors.
Pro Tip: Automate Sitemap Monitoring for New Content
Using plugins or server-side scripts, you can automate sitemap updates every time you publish new content — making sure Google always has the latest list of indexable pages.
Bonus: Proactive Website Indexability Maintenance Checklist
Don’t wait for traffic to drop. Make Website indexability checks part of your routine.
Regularly Audit With SEO Crawlers (Monthly)
Set a reminder to run a full site audit every month using tools like Screaming Frog, Sitebulb, or Ahrefs.
Use Google Search Console Alerts
Enable email alerts in GSC to get notified if your pages suddenly disappear from Google’s index.
Monitor Hosting Uptime & HTTPS Certificate Validity
Downtime and expired SSL certificates can temporarily block indexing, harming your rankings. Use uptime monitors to catch these issues before Google does.
Track Changes to Robots.txt and Noindex Rules
Set up version control for your robots.txt and regularly audit your site’s meta directives — especially after updates or migrations.
Final Thoughts
No matter how hard you work on your content, backlinks, or design — if Google can’t index your site, you won’t rank. Learning how to check website indexability is the first, and most essential, step toward better visibility in 2025.
Website Indexability isn’t a “set it and forget it” task. Make it part of your ongoing SEO maintenance. A healthy, indexable website ensures your content actually reaches the people searching for it — and that’s how real growth happens.


